Thursday, May 19, 2011

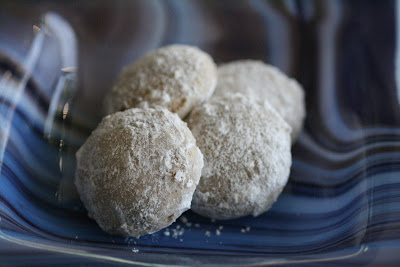
Mexican Wedding Cakes

These are my new favourite cookies. They are buttery and crumbly and really easy to make.


Mexican Wedding Cakes
Adapted from this Martha Stewart recipe
Yield: 3 dozen
Print recipe

1 1/2 cup pecans
1 1/2 cup flour
3/8 cup sugar
1/2 tsp cinnamon
1/8 tsp salt
3/4 cup butter, cut into small cubes
1 cup icing sugar
  1. In a food processor, combine pecans, flour, sugar, cinnamon, and salt. Pulse until mixture resembles coarse meal.

  2. Add butter and pulse until a dough forms.

  3. Shape dough into a disc and wrap tightly in plastic. Refrigerate for 30 to 60 minutes.

  4. Preheat oven to 325F.

  5. Remove dough from refrigerator. Pinch off about 1 tbsp of dough and roll into balls. Place on parchment lined baking sheet, about 1 inch apart.

  6. Bake about 20 minutes or until the cookies are just golden at the edges.

  7. Cool for 5 minutes on sheets, and then cool completely on racks.

  8. Roll cooled cookies in icing sugar twice to coat thoroughly.

Monday, May 2, 2011

Chocolate Mint Cookies

Today was my first official day at Hawksworth. Basically, it was just a safety orientation because the hotel is still a construction zone. We actually had to wear hard hats throughout the session, and we got scolded from some of the construction guys for not having steel-toed shoes. We got to see the kitchen, which is looking good. Lots of nice, new equipment. The pans are all Le Creuset, pretty and blue. The team is really young, and I know a couple of people, which is a bit of a relief. We get to start in the kitchen tomorrow, testing recipes and whatnot, while they assess our skill sets to figure out where we'll work when the restaurant opens. I wasn't too excited before because I was so nervous, but now that I've seen the kitchen and the people and the menu, I'm definitely starting to get into it more.

Anyway, I had most of the day off, so I figured I should do some cooking at home. I haven't been baking too much and I kind of had a craving for something sweet, so I started looking up some cookie recipes. I was thinking about the Brussels cookies from Pepperidge Farm that I used to eat when I was a kid (there were mint Brussels back then), and decided I wanted chocolate mint cookies. No one seems to have any recipes to replicate the Brussels cookies, so a quick google search on chocolate mint cookies took me to Oprah's recipe for her version of the Girl Guide chocolate mint cookies, which I also love. Perfect.

They have a very similar taste to the Girl Guide cookies, but I didn't coat them in chocolate (too lazy), so it's missing a bit of charm. They also spread a lot more than I anticipated, so perhaps next time, I would make the log a little bit smaller, probably more like 1 inch.


Chocolate Mint Cookies
Adapted from this Oprah recipe
Yield: 3 dozen
Print recipe

3/4 cup flour
1/4 cup cocoa powder
5/8 cup sugar
1/4 tsp baking powder
1/8 tsp baking soda
1/8 tsp salt
3/4 cup butter, cut into small cubes
1 egg yolk
1/2 tsp vanilla
1 tsp peppermint extract
  1. Combine flour, cocoa powder, sugar, baking powder, baking soda, and salt in bowl of food processor or stand mixer. Mix to combine.

  2. Add butter. Mix until butter is combined. Mixture will not come together.

  3. Add the egg yolk, vanilla, and peppermint and mix until dough comes together.

  4. Remove dough from bowl and shape into a 1-inch wide log.

  5. Wrap in parchment paper and refrigerate for at least 2 hours.

  6. Preheat oven to 350F.

  7. Remove dough from refrigerator. Cut into 1/4-inch discs and place on parchment lined baking sheet, about 1 inch apart.

  8. Bake 8 to 10 minutes or until the cookies are light golden brown at the edges. Cool completely on racks.

  9. Can also be coated in tempered chocolate.
Sunday, May 1, 2011

Spinach and Tomatoes with Paneer

My mom was in town for a visit and of course we did some Indian cooking while she was here. One night, we made a vegetarian dinner that included spinach and tomatoes with paneer. We used an updated paneer recipe from Vij's second book, and it is actually a lot better in both texture and taste than the recipe I previously posted.

Spinach and Tomatoes with Paneer
Adapted from Vij's At Home
Yield: 4-6 servings, as a side dish
Print recipe

1/3 cup vegetable oil
6 cloves garlic, finely chopped
3/4 can diced tomatoes, liquid removed
1 tsp salt
1 tsp turmeric
1 tbsp ground cumin
1/2 tbsp ground coriander
5 cloves
1 tsp cayenne pepper
10 oz paneer, cut into bite-size cubes
3 bunches fresh spinach, chopped into 1-inch pieces
  1. In a large pot, heat oil on medium heat for 1 minute.

  2. Add garlic and saute for 30 seconds.

  3. Stir in tomatoes.

  4. Add salt, turmeric, cumin, coriander, cloves, and cayenne. Cook for 3 to 4 minutes, or until the oil glistens on top.

  5. Stir in paneer and spinach and mix well.

  6. Cover and cook for 2 to 3 minutes or until spinach is wilted.


Paneer
Adapted from Vij's At Home
Yield: 10 oz
Print recipe

1/2 cup water
2L whole milk
1/4 cup white vinegar

  1. Place water in a large heavy-bottomed pan.

  2. Slowly add milk.

  3. Turn the heat to medium and bring the milk to a boil. This will probably take about 20 to 30 minutes.

  4. As the milk nears the boiling point, watch it very carefully with vinegar in hand.

  5. The milk will start to rise in the pot. Once it has risen 3 inches, turn off the heat.

  6. Swirl in the vinegar (do not stir in). The milk will stop rising, and solids will begin to separate from the liquid. Allow mixture to sit for 10 minutes until the liquid is completely separated from the solids.

  7. Line a fine-mesh sieve with triple-layered cheesecloth and place it in the sink.

  8. Strain the milk mixture through the cheesecloth, leaving the paneer in the sieve for about 15 minutes to drain completely.

  9. Using your hands, gather the edges of the cheesecloth, bringing them together above the paneer. Enclose paneer tightly in the cheesecloth by twisting the gathered edges against the paneer to seal out any air. Tie the gathered ends into a double knot.

  10. Place wrapped paneer on a large plate with a weight on top to flatten the paneer to about 2 inches thick, pressing out any remaining water. Allow paneer to sit for 1 hour.

  11. Unwrap paneer and place on clean plate. With a large sharp knife, cut paneer as desired.

  12. Can be used right away or can be kept, uncut and tightly sealed, in plastic wrap or resealable plastic bag, refrigerated for up to 4 days.


P.S. Happy Birthday D!
P.P.S I start at Hawksworth tomorrow - SO nervous!